
MacBook Repair, Mac repairs Mumbai
How I fixed a MacBook Pro that suffered water damage
About a week ago, my fiance's younger sister Alisha called while on her way to the Apple store. Her labradoodle Bentley had PEED on her MacBook Pro. She described the screen going black and a sizzling sound when plugging in the charger (yikes). Apple would not help her, apparently they aren’t fans of dog pee... So she ended up getting a new one and gave me the hunk of aluminum to try to bring back to life.
The following is an account of how I (mostly) resurrected the poor machine.
If you are reading this soon after suffering similar damage to your machine DO NOT PLUG IT IN. You want to turn it off immediately then follow some form of the steps I describe.
As soon as possible open it up. This is as simple as flipping it upside down and taking out all the screws that you see. You can remove these with a 5 point (pentalobe) screwdriver, preferably with a magnetic tip.
I said it was simple, but here is where I made my first mistake: I tried using T4 and T5 drives to remove the screws from the case. The problem with T drives is that they are 6 point (hexalobe) and I completely stripped some of the screws in frustration before realizing the disparity. If you make the same mistake, I found that a quick drilling with a titanium coated 5/64'' drill bit pulled those suckers right out. Be careful not to push into the case with the drill and try to stay as close as you can to the middle of the screw to avoid damaging the case threads.
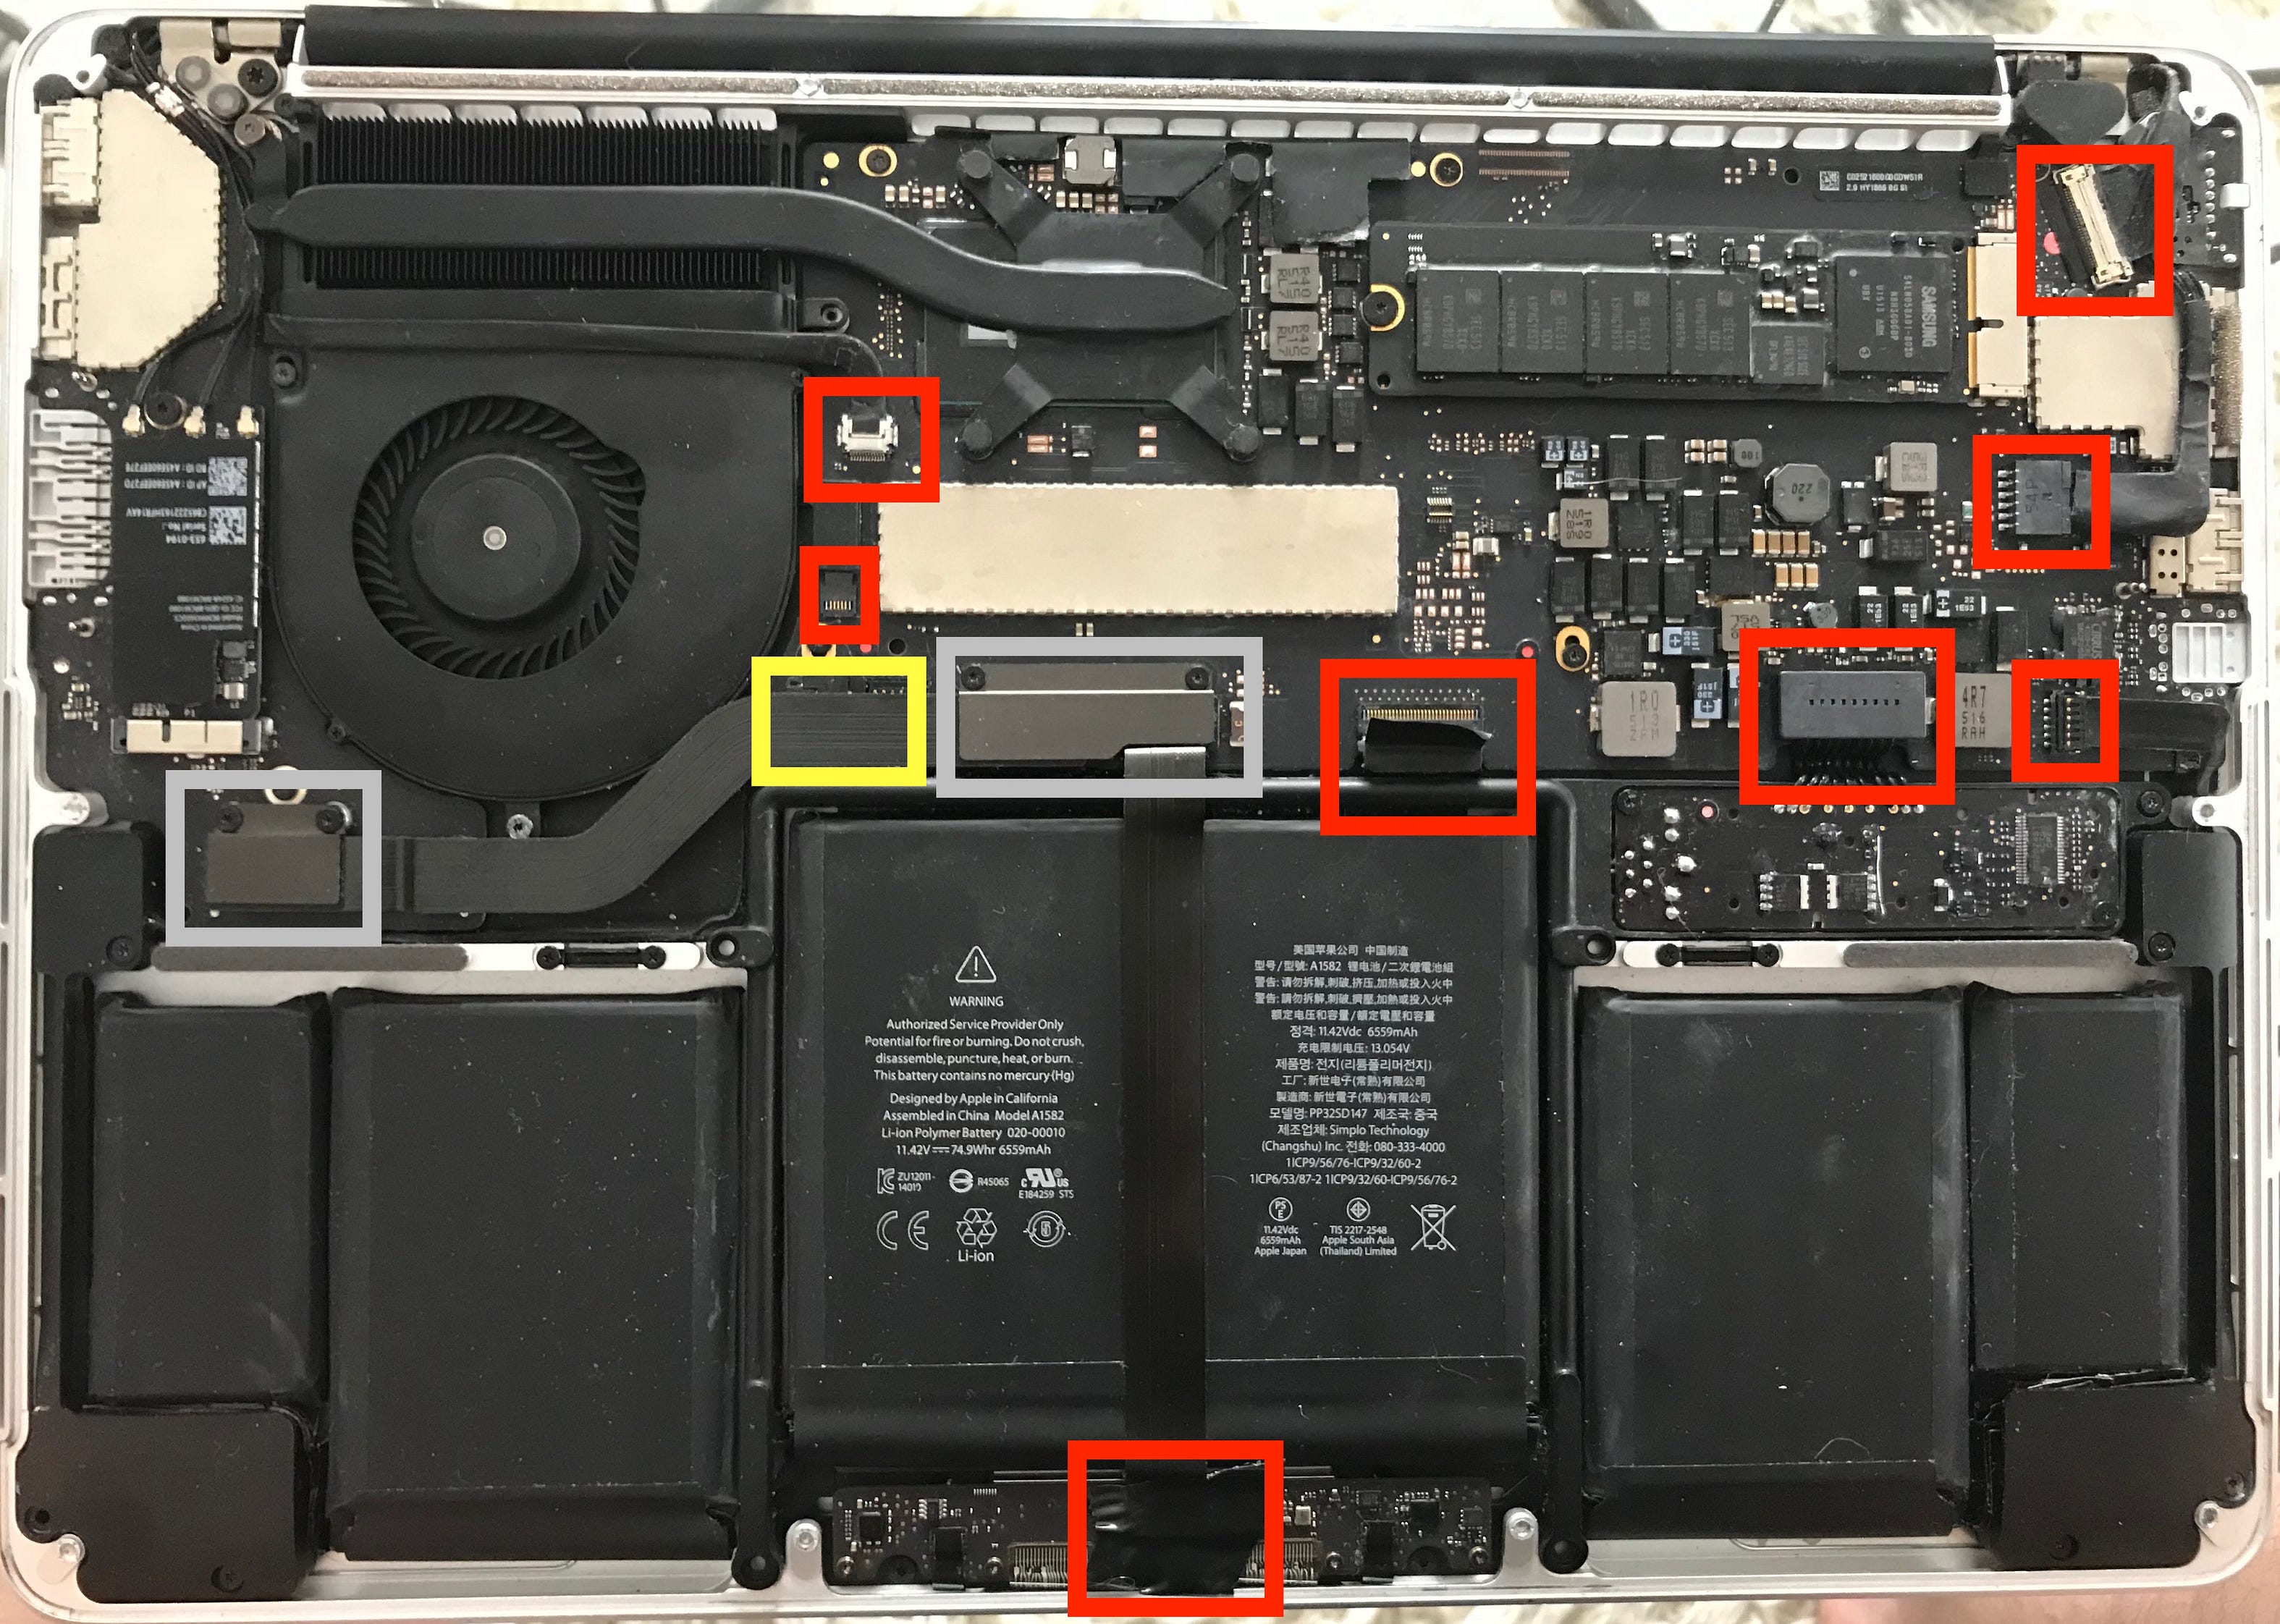
Once you have the bottom case off, dry off any places where you see standing water (or pee) and take the major components out. I started by unplugging the cables that connected components to each other. There are four cable connections that can only be reached after removing two metal plates indicated on the picture as grey boxes. Each plate hides one connection, and removing the cable that bridges them reveals two more (indicated by the yellow rectangle).

I hope you kept that T5 I mentioned earlier as all the screws INSIDE the case are 6 point… And there are a lot of them… And they come in several different sizes; so I encourage you to come up with a system for keeping them all in order.
One thing I cannot stress enough with a DIY project: patience and consistency will pay off. Frustration is easy when doing something new. So take a deep breath, grab a glass of your favorite ethanol based drink, turn on some noise that helps you focus and dive into the project.
I started from the top right corner and removed each screw working towards myself from right to left. For each type of screw I took a short video to document where I got the screw from and what it looked like compared to the others.


Once you have removed the screws, start taking parts out! I started with the speakers and SSD, then removed the cooling fan. At this point you should be able to remove the motherboard. You will have to make sure the charger port is out of it’s nook, then gently pull the board to the left and up.

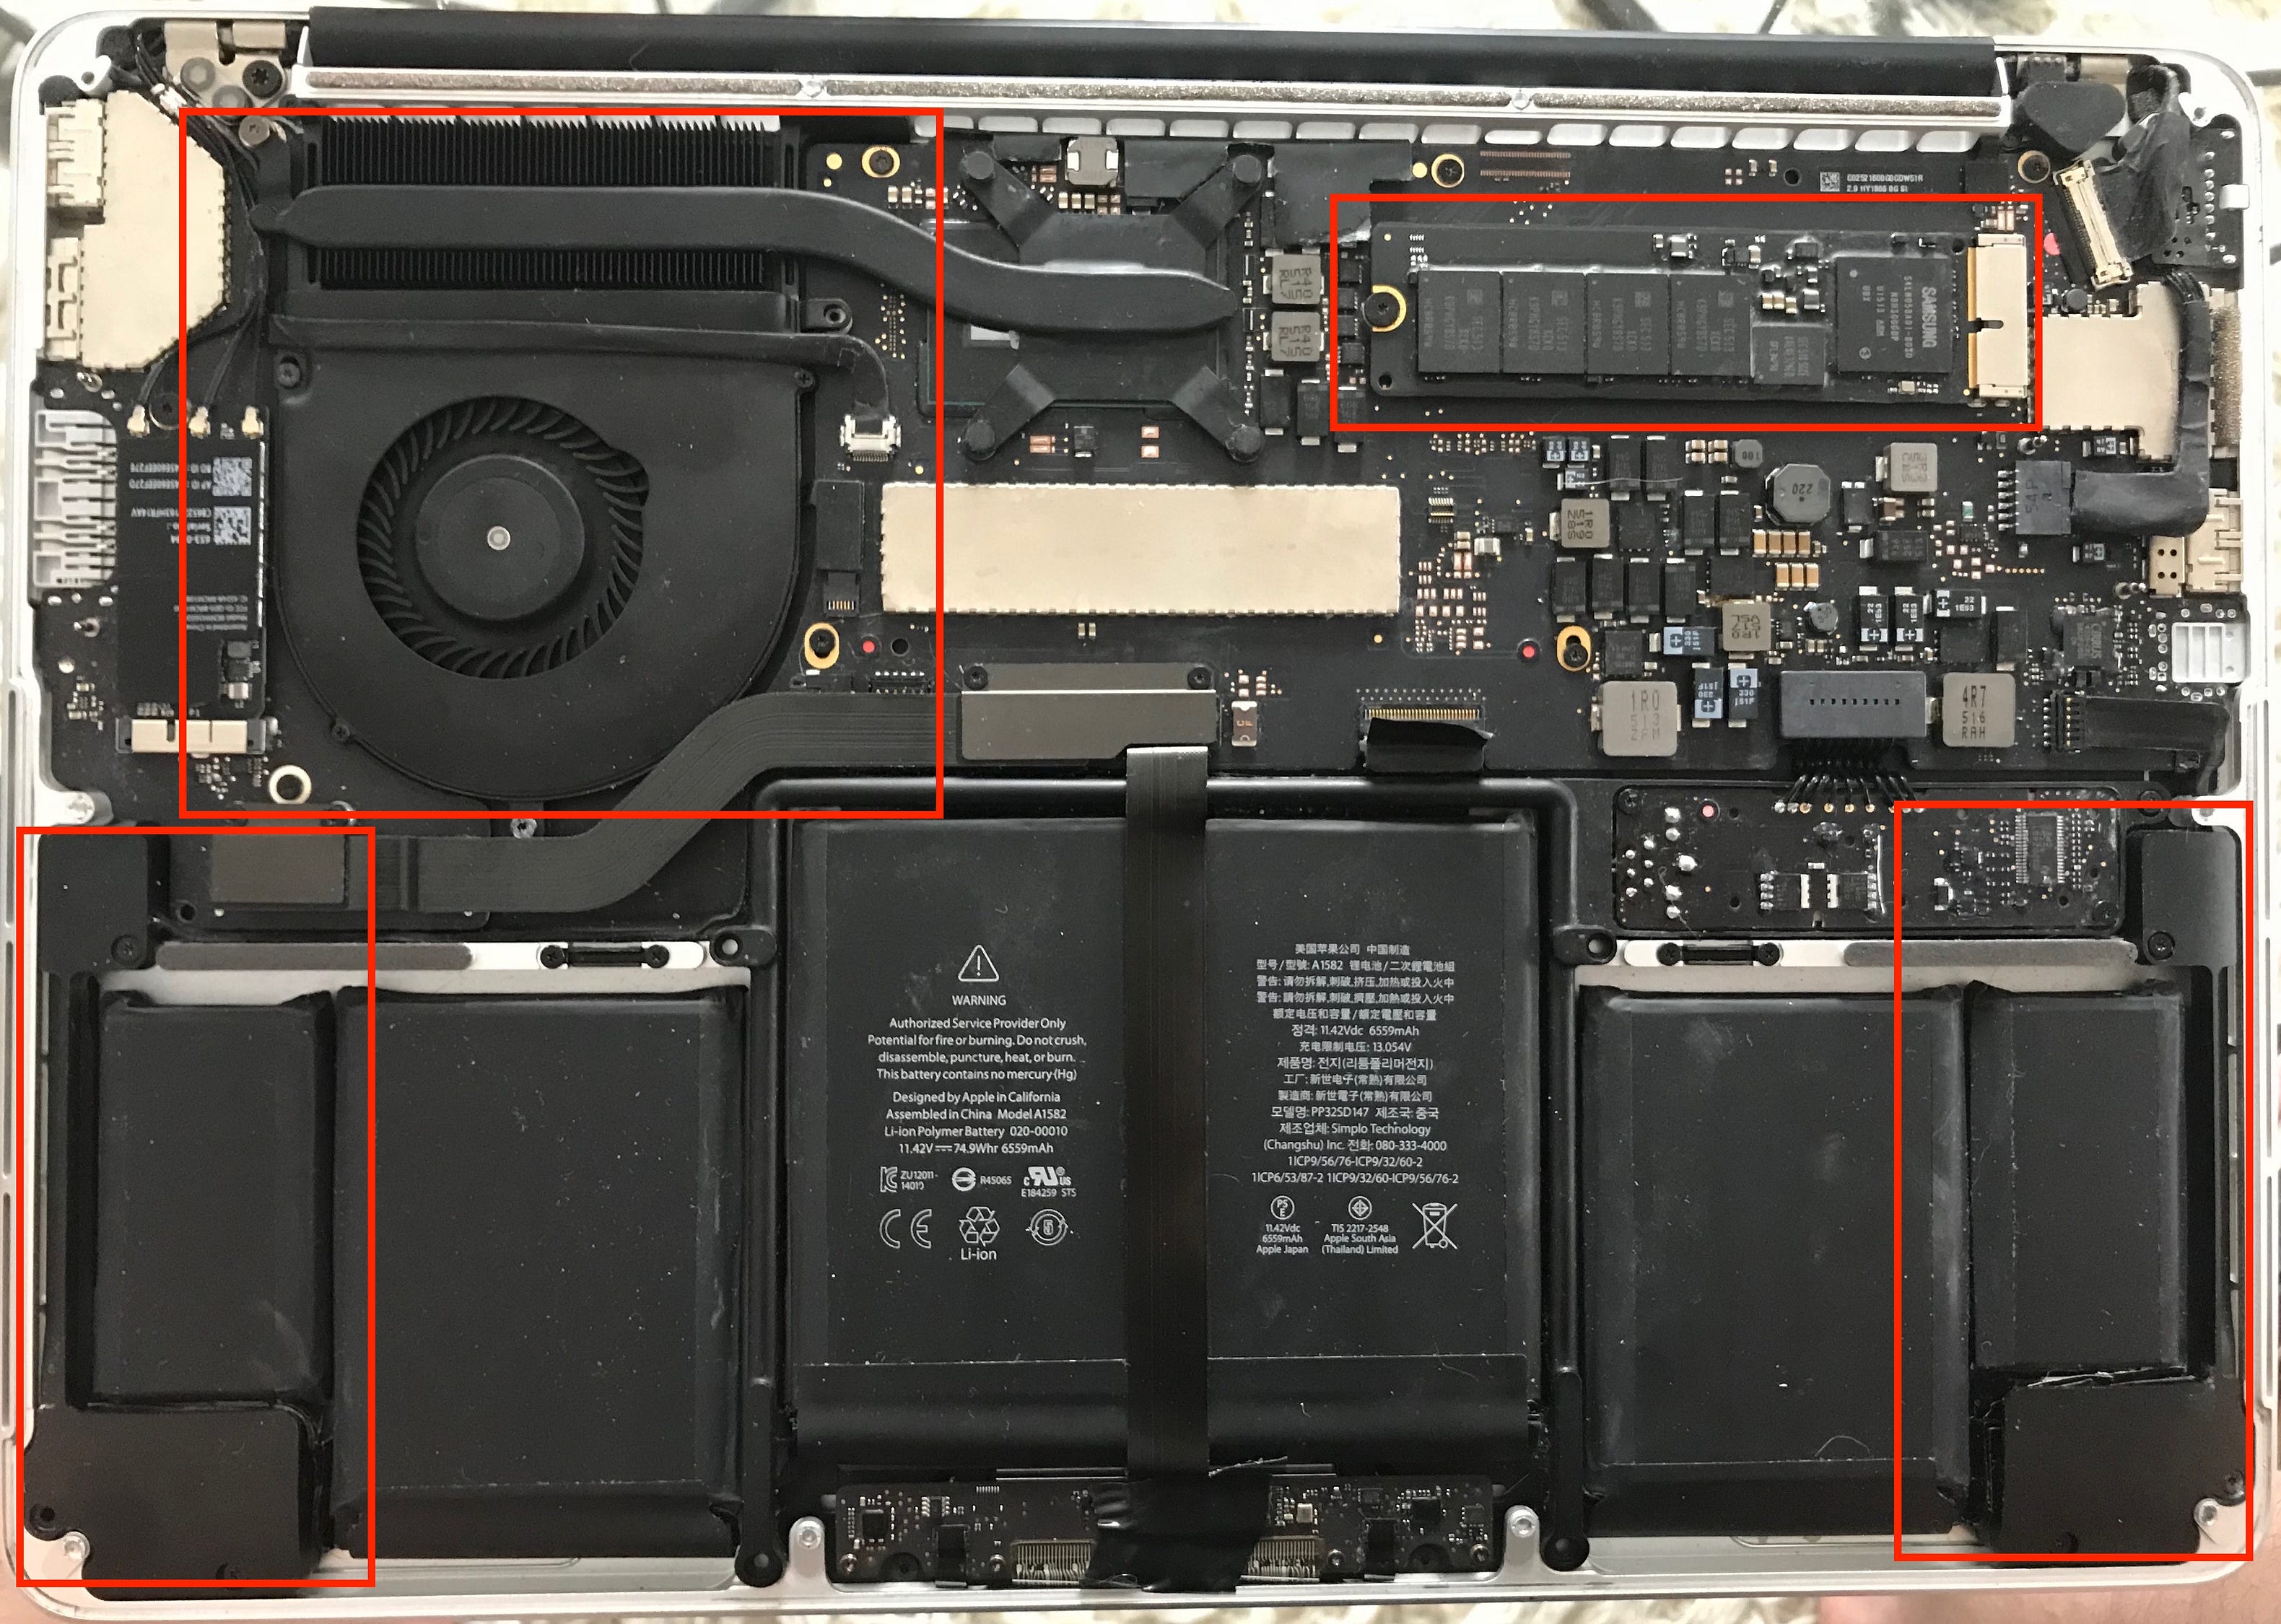
This is where I stopped the teardown. I did not see a lot of standing water in the case so I did not take the keyboard or screen apart. Inspect the components and inside of the case for liquid, drying whatever you find. I took the parts and laid them out on a towel in a dry area of my house where they could sunbathe for a day or two.
The next step is to remove any corrosion that has built up on the components. This will look kind of like a toothpaste stain on or around any metallic piece. To do this you will need 90% isopropyl (rubbing) alcohol and a toothbrush or other soft brush. I recommend wearing latex gloves because the alcohol can dry your skin out and can be toxic via skin absorption. I placed the board in a glass baking dish, and poured a bit of alcohol over it. This made my heart race a bit, it feels sinful to douse a piece of electronics in any liquid, but trust me it will be alright. For a good laugh, take a video of you doing this and send it to your friends. Now take the brush and give the whole thing a gentle brushing. Get between all pieces and inside all the cable connectors. Make sure to get both sides, then set it down so that air can reach the wet areas and let it sit for about an hour to evaporate the alcohol. Be careful leaving the alcohol unattended, it is not safe for any living beings to ingest or inhale too much of.
I repeated this process with the SSD only, but anywhere you see toothpaste scrub it off!


After the alcohol dried, I checked the components and identified any persistent corrosion. I scrubbed those places down again, more thoroughly than the first time. Let them dry again and repeat until you cannot find any more corrosion. It can be helpful to use a magnifying glass so you do not miss anything between the very small pieces of the board.
If the air drying left streaks anywhere, you can dampen with the alcohol then gently wipe these areas dry with paper towel.
I let the parts sit out until I got home from work the next day, then put it all back together!
At this point, I taped the bottom case on so that I could easily get back in if needed. I then plugged it in, which gave me the amber charging light, and hit the power button.
Much to my delight (and surprise if I am being honest) the machine powered up. I was able to login, access the internet, play music and videos and open programs and files. The only issue I could see was that the screen had suffered some significant damage. It was still usable, though probably not for video/photo editing or any design work. Satisfied thus far, I unplugged it to see if the battery held a charge and poof, computer was dead… Bummer. I took the case off and rechecked the battery connections, put it together and tried again. This time I noticed the battery indicator on the screen was telling me to replace the battery now. At least it recognized the battery!


At one point, the machine complained that there was no wifi hardware found. This was because the elongated s shaped cable that hides beneath the two metal plates was not plugged in correctly. Fixing this brought back the wifi right away.
https://www.applelaptopservicecenter.net/


0 Comments